How to install on Android
- Keep the QR code open on another device/screen so your phone can scan it.
- Use a stable internet connection throughout the process.
- The QR code works only once—do not scan it more than one time.
- Do not remove the eSIM after installation, as it cannot be reused.
- We recommend naming the new eSIM “VOYE”.
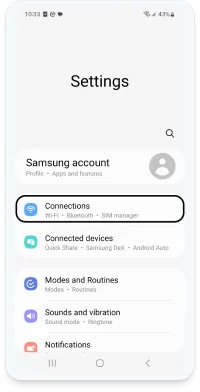
Step 1
Open “Settings” > “Connections”.

Step 2
Tap “SIM manager”.
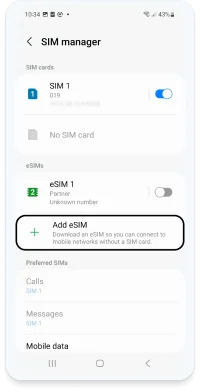
Step 3
Select “Add eSIM”.
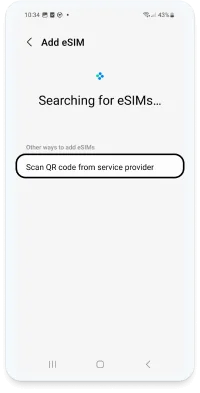
Step 4
Tap “Scan QR code from service provider”.
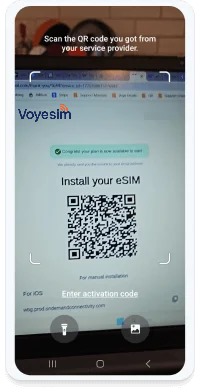
Step 5
Scan your QR code (on another screen or device).
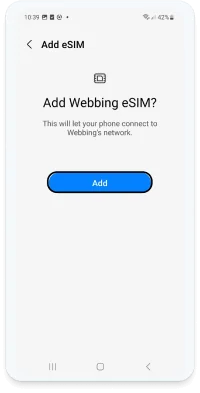
Step 6
Confirm by tapping “Add”.
Step 7
Your eSIM is now listed in “SIM manager”. Under Preferred SIMs:
• “Calls” → your physical SIM
• “Messages” → your physical SIM
• “Mobile data” → your eSIM
Activate abroad
- Open “Settings” > “Connections” > “SIM manager”.
- Enable your eSIM.
- Set “Mobile data” to your eSIM.
- Ensure “Data roaming” is ON in “Settings” > “Connections” > “Mobile networks”.
Back home
Restore your primary line:
- Go to “Settings” > “Connections” > “SIM manager”.
- Turn the eSIM off.
- Turn your primary SIM on.
- Make sure “Data roaming” is OFF in “Settings” > “Connections” > “Mobile networks”.
How to install on iOS (up to 17.3)
- Open the QR code on another screen so your iPhone camera can scan it.
- Ensure a stable internet connection.
- The QR code can only be used once.
- Don’t remove the eSIM after installation.
- We suggest naming the eSIM “VOYE”.
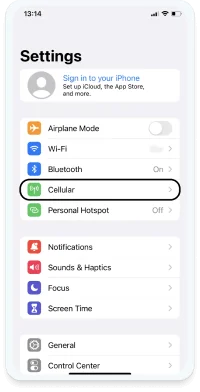
Step 1
Go to “Settings” > “Cellular”.
Tip: On iOS 17.4+, you can long‑press the QR code, tap “Add eSIM”, allow activation, then skip to Step 5.
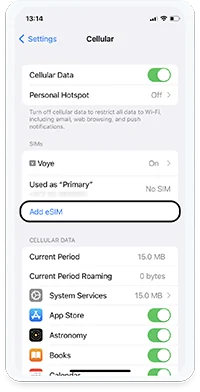
Step 2
Tap “Add eSIM”.
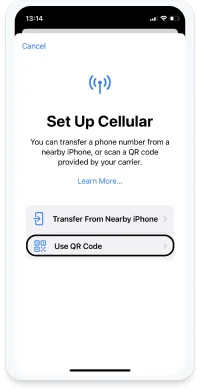
Step 3
Choose “Use QR code”.
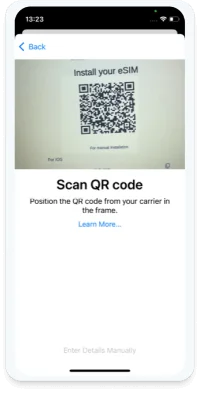
Step 4
Scan the QR code (displayed on another device/screen).
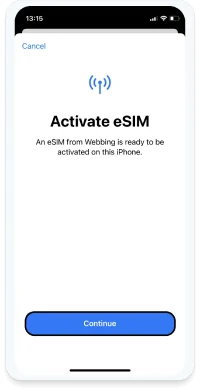
Step 5
Tap “Continue”. This may take a moment.
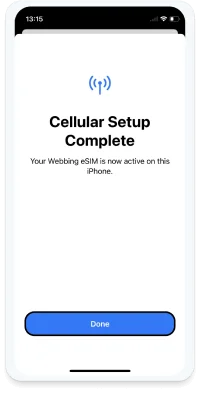
Step 6
Tap “Done”.
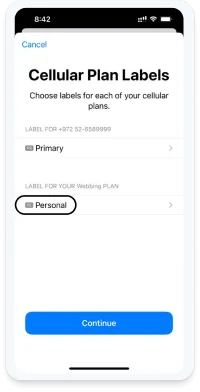
Step 7
Under “Cellular Plan Labels”, tap the new eSIM to rename it.
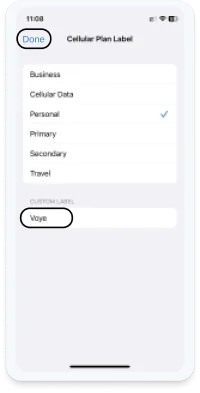
Step 8
Rename it to “Voye” and tap “Done”.
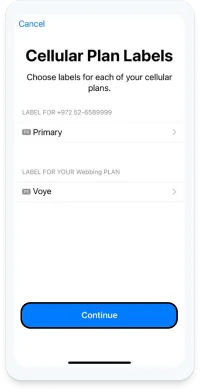
Step 9
Tap “Continue”.
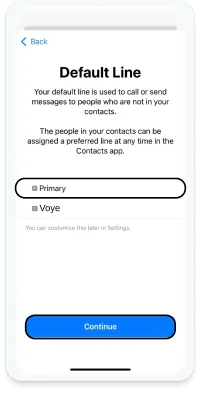
Step 10
When prompted, select “Primary” for “Default Line”.
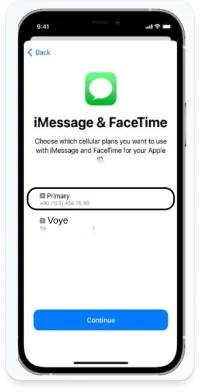
Step 11
Select “Primary” for “iMessage & FaceTime”.
Step 12
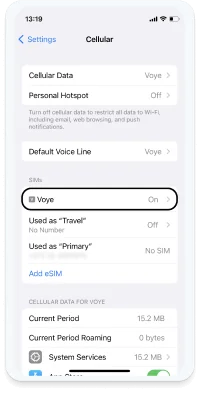
All set! Your eSIM appears in “Settings” > “Cellular”.
Activate abroad
- Go to “Settings” > “Cellular”.
- Enable your eSIM.
- On the eSIM settings, turn “Data Roaming” ON.
- In “Cellular Data”, ensure “Allow Cellular Data Switching” is OFF.
Back home
Restore your primary line:
- Open “Settings” > “Cellular”.
- Turn your eSIM off.
- Turn your Primary line on.
- Ensure “Data Roaming” is OFF.
How to install on iOS (17.4 and above)
- Display the QR code on another device/screen for scanning.
- Make sure you are connected to a stable internet network.
- The QR code is single‑use.
- Do not remove your eSIM after installation.
- We suggest naming the eSIM “VOYE”.
Step 1
Open “Settings” > “Cellular”.
Shortcut: Long‑press the QR code > “Add eSIM” > “Allow” on “Activate New eSIM”, then jump to Step 5.
Step 2
Tap “Add eSIM”.
Step 3
Choose “Use QR code”.
Step 4
Scan the QR code shown on another device/screen.
Step 5
Tap “Continue”. Activation may take a moment.
Step 6
Tap “Done”.
Step 7
Under “Cellular Plan Labels”, select the new eSIM to rename it.
Step 8
Rename it to “Voye”, then tap “Done”.
Step 9
Tap “Continue”.
Step 10
When asked, choose “Primary” for “Default Line”.
Step 11
Choose “Primary” for “iMessage & FaceTime”.
Step 12
Done! Your eSIM appears under “Settings” > “Cellular”.
Activate abroad
- Go to “Settings” > “Cellular”.
- Enable your eSIM.
- On the eSIM page, turn “Data Roaming” ON.
- In “Cellular Data”, keep “Allow Cellular Data Switching” OFF.
Back home
Restore your primary line:
- Open “Settings” > “Cellular”.
- Turn your eSIM off.
- Turn your Primary line on.
- Make sure “Data Roaming” is OFF.